Not sure what the official term for this is but I usually just call it 'gradient editing' - basically it's a combination of the gradient tool and the quick mask option, which I find the most amazing way to subtly edit shots for a great result. It works on the basis that you can target certain areas of a photo to edit, without making it obvious. Whether you want a certain area to be darkened, lightened, sharpened, saturated or anything else this is one of the easiest ways to do it.
I find this editing process relevant for most types of photography, but tend to enjoy its results a lot more on portrait and landscape shots.
When you open the gradient tool on the left menu in photoshop (a rectangle that fades black to white, could be hidden under the paint bucket tool if you can't find it), you have 5 options at the top which look like this:

From left to right, you have linear, radial, angular, reflected and diamond. I've only ever found the linear and radial options useful. I will show an example for each of these three following.
First, the linear gradient. This is a fantastic option for landscapes where you have a simple sky and land or sky and water set up, and either the sky or ground needs to be lightened, darkened, saturated, sharpened or anything else.
The best way to even out sky and ground in a photo is always with an ND grad filter (see
accessories). If that's not available, or you've used an ND grad and still need some more adjustment, this helps. Usually I will use both an ND grad (or 2) and this tool as a combination.
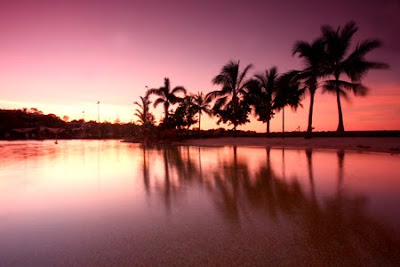
This is a photo I took recently at airlie beach, using an ND4 grad filter (to darken sky, lighten water) and an ND8 filter (darkens all of the photo, slowing the shutter speed to smooth water). This was shot at 5 seconds, f/22 at ISO100 - the smallest
ISO and largest
f/number giving the slowest
shutter speed possible, which smooths out water. This was at 10mm on my
sigma 10-20mm.
As a general rule, the sky will pretty much always be lighter than the ground, so I use a setup like this very often. This is the shot straight off the camera, a bit red/purpley as that is the effect of the plastic filters. I don't mind the effect though as it gives it quite a cool sunset look:
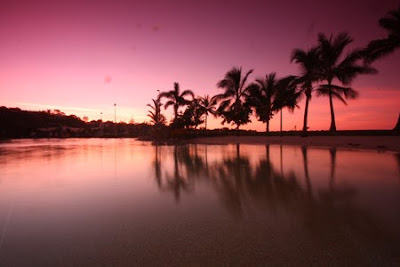
Never mind the dust spots in the top left of the photo - the filters are a bit dirty. I will get rid of those at the end using the clone stamp tool, google it if you're not sure. Next thing to do - it's a nice shot but there is some saturation and light lost in the water in this photo. What I want to do is subtly lighten and saturate the bottom half of the photo to even it out nicely.
Here we go! Select the gradient tool -> linear gradient (the first one out of 5). Hit the 'q' button to enter quick mask mode. What you'll need to do now is drag the cursor perpendicular to the area boundary that you want to change. Drag this from the area you want kept the same, towards the area you want to edit. The longer the drag distance, the more graduated your edit will be. The boundary between water and sky in this shot is quite obvious, so let's not drag too far:
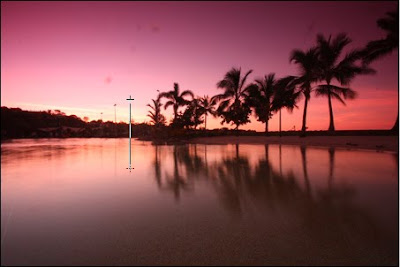
In other circumstances, or when I want the edit to be less obvious, I might drag the cursor all the way from top to bottom. As a simple horizontal sky/water arrangement, this wasn't needed.
When you release the cursor, the photo will look like this. The red area is the area that won't be edited, the clear area will be:
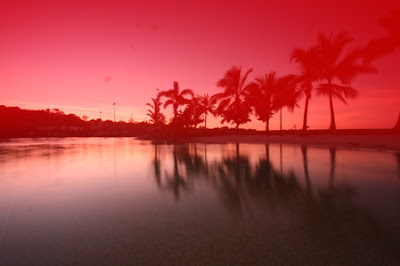
Hit 'q' again to escape. Now your photo will have a selected zone which you can edit:
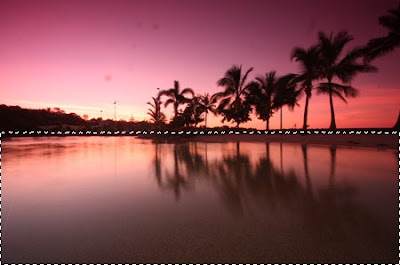
Now all actions you make will only be made on this gradiated section - even though it looks like a rectange, the top of it is graduated, so what you do will be very subtle and not look like it was overprocessed. I used
levels to brighten midtones, and added some
saturation to the magentas to bring the purple up. I deselected the area, and used levels again on the photo as a whole, now that it was evened out. After clone stamping out the dust spots and also the distracting tree at top right corner, voila! A nice and evenly exposed and saturated photo, from top to bottom:
It's not a massive change - but that's the thing, it never should be. The best way to edit is to make it look like you didn't at all, to make subtle changes that vastly improve the shot without the viewer noticing. The gradient tool is massive for me in making this happen.
Check out
part 2 for usage examples of the radial gradient!
Cheers
Tal


 There are some pretty basic rules for portraits that ensure you get a good shot. They're not by any means the only way to shoot a portrait - photography that breaks the rules is often the most amazing - but they will definitely help you get a great shot especially as a beginner.
 I haven't edited the photo in photoshop - only cropped from this, the original image from the camera:
 The photo has still turned out ok, but you can see how bright the grass is compared to the player, taking away the eye's natural focus towards the action. Scroll back up to the original photo I posted and you can see the difference. As I've said, if you can help it, try your best to get the sun pointed at your subject.

 Turn the camera on to its manual setting. Set the aperture to its lowest f/number (should be about 3.5 or 4). Set the camera to ISO 400. Shoot on JPEG, with a +2 saturation if possible (tutorial here). Once you have all this, you're pretty much set. All you have to worry about now is composition and shutter speed. This will depend on the amount of ambient light, and I will usually go between 1/2 of a second and 1/50th of a second. I would be using 1/2 (looks like 0"5 on the camera) at a dark club, 1/6th at a bar with a few lights around, 1/20th in a normally lit room and 1/50th in a bright indoor room. The beauty of digital is that you can just try out different speeds and see what looks best on the screen. You should be aiming to have an even lighting of subject and background. This is why you need to shoot manual, on auto, the camera will just choose 1/60th and your subjects will just be in front of a boring black backdrop (cough cough romanceinmypants).
 I'm hoping this photo disect is something that will be very interesting - when I was doing my initial research on ND grad filters it took so long to work out what they actually are. Check out my accessories page to have a look at that:
 ND grad filter means "Neutral Density Graduated Filter", meaning that the top half of the filter is dark at a neutral density (no colour), and gradually fades into clear at the bottom half of the filter. You can get these at different magnitudes ND2, ND4, ND8 etc - I find getting 2 ND4s is usually the best option. I have 2 of these, and half the time I use 1, the other half I like to stack them on top of each other for more of an effect. Just don't store them in the same case, or they will rub and scratch.


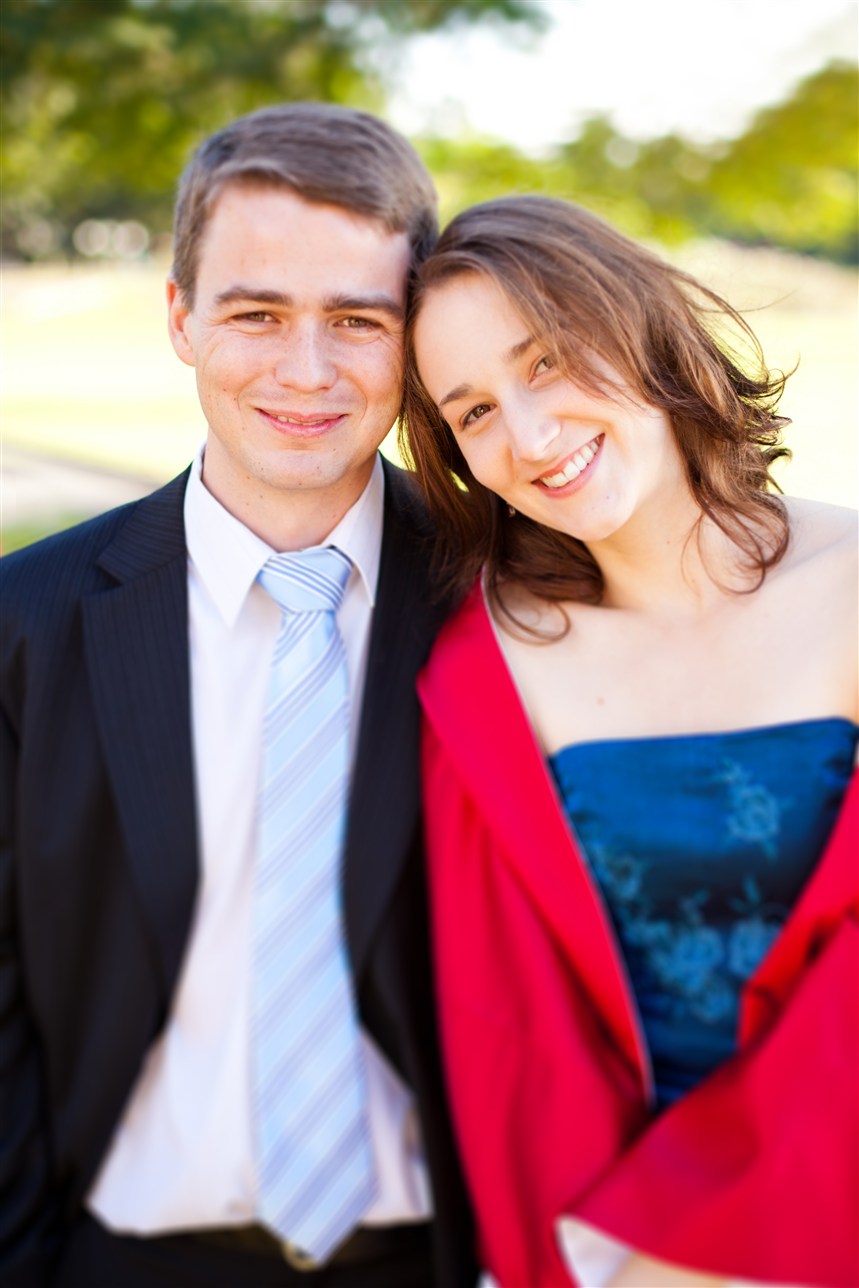
 Nice shot off camera - but a good idea to make the attention more towards his face. Time for a radial gradient. In photoshop CS, hit gradient, at the top choose radial (the circle one, second from the left). Then hit 'q' to enter quick mask. Drag the cursor out from the centre (his face here) to twice the length of the radius you're looking to edit, like so:
 You will see a red circle fading outwards appear over the target. This is the gradial area that won't be affected by your actions. Press 'q' to escape quick mask and you will see a selection circle. Everything outside this circle will be affected by your edits, but it will be faded, and not obvious. This gives you a great opportunity to subtly lead the viewers' eyes to a certain part of your photograph. For this shot, I used levels to darken midtones in the area around the face, and then hit select -> inverse to reverse my selection, and brightened highlights on the face. I deselected the area and gave the whole photo some brighter midtones using levels again. Here is what I came up with, and a comparison of the original. It is subtle, but a big difference, exactly what you should be looking for. Original is the left, edit on the right:
 The photo looks barely edited, but draws attention straight away to the face. Great way to use radial gradients in my opinion - but as I've said, DON'T OVERDO IT! Or you will just be another one of those people that over-vignettes every photo - unprofessional, and lazy!
 Never mind the dust spots in the top left of the photo - the filters are a bit dirty. I will get rid of those at the end using the clone stamp tool, google it if you're not sure. Next thing to do - it's a nice shot but there is some saturation and light lost in the water in this photo. What I want to do is subtly lighten and saturate the bottom half of the photo to even it out nicely.
 In other circumstances, or when I want the edit to be less obvious, I might drag the cursor all the way from top to bottom. As a simple horizontal sky/water arrangement, this wasn't needed.
 Hit 'q' again to escape. Now your photo will have a selected zone which you can edit:
 Now all actions you make will only be made on this gradiated section - even though it looks like a rectange, the top of it is graduated, so what you do will be very subtle and not look like it was overprocessed. I used levels to brighten midtones, and added some saturation to the magentas to bring the purple up. I deselected the area, and used levels again on the photo as a whole, now that it was evened out. After clone stamping out the dust spots and also the distracting tree at top right corner, voila! A nice and evenly exposed and saturated photo, from top to bottom:
 It's not a massive change - but that's the thing, it never should be. The best way to edit is to make it look like you didn't at all, to make subtle changes that vastly improve the shot without the viewer noticing. The gradient tool is massive for me in making this happen.