Saturday, April 24, 2010

Photo Disect - ND Grad Seascape

The photo:

I'm hoping this photo disect is something that will be very interesting - when I was doing my initial research on ND grad filters it took so long to work out what they actually are. Check out my accessories page to have a look at that:

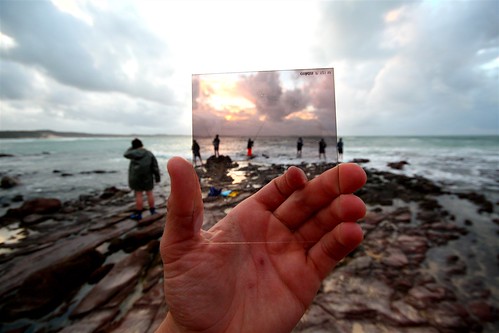
ND grad filter means "Neutral Density Graduated Filter", meaning that the top half of the filter is dark at a neutral density (no colour), and gradually fades into clear at the bottom half of the filter. You can get these at different magnitudes ND2, ND4, ND8 etc - I find getting 2 ND4s is usually the best option. I have 2 of these, and half the time I use 1, the other half I like to stack them on top of each other for more of an effect. Just don't store them in the same case, or they will rub and scratch.

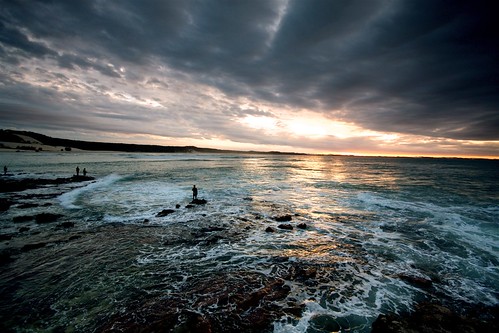
I was out shooting sunrise at a beautiful harbour in eastern Victoria on the summer holiday road trip I had with some other photo-minded mates. I saw a great cloud/water reflection happening and wanted to shoot it against the subject of a pier and sailboat. I shot it without any filters, and noticed that while the reflection was present, the water was considerably darker than the sky (as usual) and the photo wasn't very effective. This often happens - your eyes will automatically lighten dark areas and darken light areas - the camera cannot do this. Being able to see like a camera takes a bit of experience - whenever you shoot, make sure you note the difference between what you see and what comes up on the camera screen - it will help! ND grads are a great help with this.

I decided to stack my two ND4 grad filters together and got this shot straight off the camera. I was shooting Av (aperture priority mode) on f/6.3 with my sigma 10-20mm lens set at its very widest at 10mm. To get a quick shutter speed (as I didn't have a tripod - mistake!) I was on ISO400 - a lot faster than ISO100, but a little bit of grain. ISO400 is probably my favourite for handheld shooting, the noise is manageable and you get a nice quick shutter speed. Here's the result straight off camera:


Nice, but pretty drab, and I find the water to still be a bit dark for my preference. Also find the patch of trees at the right distracting. You might also notice a purple/pink tinge to the top half of the photo. This usually occurs with plastic filters - it can be edited out in photoshop but I actually like the effect in this shot, makes it interesting!

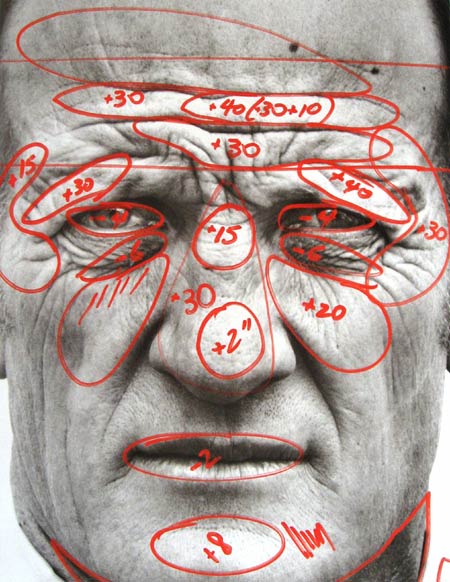
Now to photoshop :) Don't call me a cheat - this is just the equivalent of going into the darkroom for all those purist film photographers. Lots of people (usually oldies :P) come up to me and say oh I used to take such good film photos but my digital ones just aren't very good, I can't work out all the settings etc etc. Silly! The cameras are the same - you still only really have to worry about aperture, shutter speed, ISO and white balance. All the other settings don't make a massive difference, or are gimmicks to get you to buy a new camera. The difference for people who used to shoot film is that they would have their shots professionally processed by people who knew what they were doing. This is the equivalent of sending your digital originals to a photoshop guru - the results are obviously going to be great. People need to understand the importance of at least a decent grasp of the basics in photoshop which really aren't hard to learn. Check out my photoshop tutorials for that.

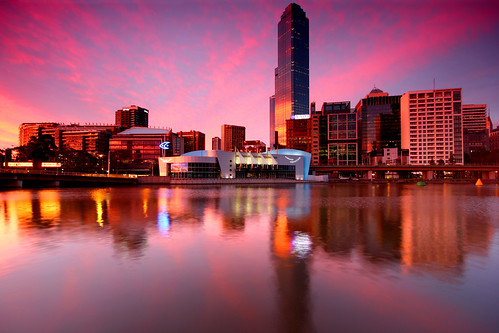
Anyway, rant over! I cropped to get rid of the distracting element at right. I then used a gradient quick mask edit using levels to keep the sky the same exposure, but lighten the water. After the photo was even, I used levels again on the photo as a whole to get the contrast and exposure perfect. I then added in some nice saturation to make it pop.

Et voila!

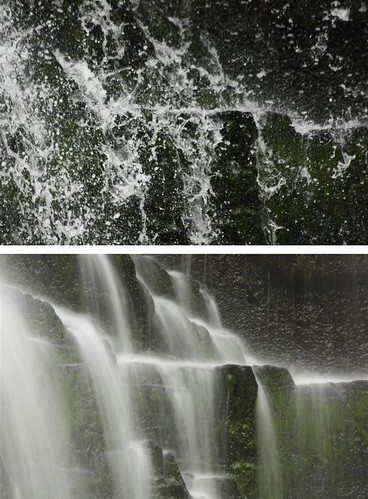
Here's a comparison of original to edited. Not too big an edit really - exactly the kind of thing that a film lab would do for you back in the day.


If you're into landscapes - ND grads are awesome. Get 2 cheap on ebay -

http://shop.ebay.com.au/i.html?_nkw=nd+grad+p&_sacat=0&_trksid=p3286.m270.l1313&LH_AvailTo=15&_odkw=nd+grad+p+series&_osacat=0&bkBtn=

Look for one of the cheap rectangular ones, and just hold them in front of the lens when you're shooting - with the darker top half over the light sky and the clear bottom half on the dark ground. Best for sunrise and sunset - light during the day is still too harsh for these filters to make much of an effect. Great results!

Here's a few more shots I've got from my ND grad filters:

http://www.flickr.com/photos/andrewtallon/3708989536/
http://www.flickr.com/photos/andrewtallon/3708180169/
http://www.flickr.com/photos/andrewtallon/4140047330/
http://www.flickr.com/photos/andrewtallon/4199079853/
http://www.flickr.com/photos/andrewtallon/4199859102/
http://www.flickr.com/photos/andrewtallon/4199856030/


Good Luck!
Cheers
Tal

Friday, April 23, 2010

Photo Disect - City at Night

A city night shot is one of those shots that really sets your photography apart from those with compacts, or pretty much anyone shooting on auto. It really impresses people! It's a great place to start learning how to control manual settings, as you have all night to get it right - there's no pressure on getting the shot quickly. And you can always come back again another night. Sometimes, like the following shot (which was taken when I didn't have very much experience at all) you'll get a lucky one that stays in the portfolio for years down the track.

Here's a shot I took from a great spot in Paddington overlooking Brisbane City:


There is an extra element in the light trails of a passing car, but the method behind the shot is still the same as any city night shot.

To make your shot stand out, you really need an 'extra element' in it than just a few buildings. An easy way to get this is to have water in the foreground which will create attractive reflections from the lights. Another option is to get a unique perspective, perhaps using an interesting lens such as a wide angle. Here, I've opted to add in the light trails from a car travelling past.

For this kind of shot, you'll need a tripod and I strongly recommend a remote shutter, cable or wireless. If you don't have a remote shutter you'll need to select the shutter delay option in shooting modes. Because you have the tripod, you won't need to worry about camera shake, so always aim for ISO100 or 200. You also have the freedom to aim for the sharpest aperture possible. In this photo, I was shooting on aperture priority mode and selected ISO100 and f/11 for those reasons. The camera chose a 20 second exposure. This was enough for me to get the light trails going all the way down the hill. If the camera had chosen something like 5 seconds, I would have increased the f/number to something like f/20 to make sure my shutter speed was long enough. The camera's shutter speed should default from about 1/4000 sec to 30 sec.

To shoot longer than 30 seconds, you'll need to shoot on manual mode on 'bulb' with a cable release. You'll have to guess your aperture and ISO that will shoot whatever shutter speed you will use. The magic of digital is seeing the results straight away. If it's too light, increase f/number. If it's too dark, decrease f/number or increase ISO.

Anyway, I was happy with 20 seconds. I mounted my camera on my tripod at its shortest length so it was nearly level with the road, to get a good perspective. This is a very simple photography trick - get low, low, low, low.. Changing your angle from head height (which is everyone's normal perspective) to down low will give you a much more interesting angle.

I plugged my cable release into the camera and fixed composition. Just as the car was about to drive past I clicked the button, the camera did its thing, waited 20 seconds, and the shot popped up on the screen. Excellent! I'd had many other goes at this shot, with cars going each way and different perspectives but this one was easily the best. Once you think you get 'the shot', don't stop! You will learn what you like from that shot and keep improving on it. Half an hour before this one I thought I'd got something brilliant, but I kept shooting and ended up discarding that one and going with this!

I only did some minor levels adjustments in photoshop - you generally won't need much editing for city night shots as the lighting is quite even.

So get out around the town at night with your tripod and have a go at this. Having the time to get used to playing around with aperture, ISO and shutter speed will help you so much - and you've got all the time in the world to practice and get it right.

Good luck!
Cheers
Tal

Tuesday, April 13, 2010

Processing - Gradient Edits 2

And here we are at part 2, to continue from part 1 here if you missed it. I will now be covering the other gradient quick mask option I use most.

Radial Gradient. This one produces a circular gradient, and is perfect for attracting the viewer's eye to a particular part of a shot. I find most use for this in portrait, fashion, or band shoots. I will usually darken areas around the face and lighten and sometimes sharpen the face. This is done subtly - you want the viewer to look at a certain part of the photo without realising why. There are plenty of wedding and portrait photographers who will completely overuse this or the vignette tool for effect. It looks gross, and unprofessional!! If you nail a gradient edit on a face in a portrait subtly, the effect will be many times more effective.

Here's a portrait style shot I shot recently at a pre-formal event. This was shot on Av mode at an aperture around f/2.0 for background blur, ISO400 for a quick shutter speed to make sure of sharpness. His head, the main focus, is at about the intersection of 2/3 to the right and 2/3 to the top, bit of a rule of thirds! Check it out on wikipedia - just search rule of thirds, a professional way to shoot portraits that will help you stand out from those shooting dead centre. Shots like the official presidential portrait of Barack Obama are done this way!:

Nice shot off camera - but a good idea to make the attention more towards his face. Time for a radial gradient. In photoshop CS, hit gradient, at the top choose radial (the circle one, second from the left). Then hit 'q' to enter quick mask. Drag the cursor out from the centre (his face here) to twice the length of the radius you're looking to edit, like so:

You will see a red circle fading outwards appear over the target. This is the gradial area that won't be affected by your actions. Press 'q' to escape quick mask and you will see a selection circle. Everything outside this circle will be affected by your edits, but it will be faded, and not obvious. This gives you a great opportunity to subtly lead the viewers' eyes to a certain part of your photograph. For this shot, I used levels to darken midtones in the area around the face, and then hit select -> inverse to reverse my selection, and brightened highlights on the face. I deselected the area and gave the whole photo some brighter midtones using levels again. Here is what I came up with, and a comparison of the original. It is subtle, but a big difference, exactly what you should be looking for. Original is the left, edit on the right:

The photo looks barely edited, but draws attention straight away to the face. Great way to use radial gradients in my opinion - but as I've said, DON'T OVERDO IT! Or you will just be another one of those people that over-vignettes every photo - unprofessional, and lazy!

So hopefully these 2 tutorials have helped you understand the possibilities involved with using the gradient -> quick mask option. Even though it does gradially edit, you still have to be careful that it's not obvious to the viewer that your photo has been edited. Have a play around with bigger and smaller radius options for both linear and radial gradients and see the effects.

Good Luck!

Cheers
Tal

Processing - Gradient Edits 1

Not sure what the official term for this is but I usually just call it 'gradient editing' - basically it's a combination of the gradient tool and the quick mask option, which I find the most amazing way to subtly edit shots for a great result. It works on the basis that you can target certain areas of a photo to edit, without making it obvious. Whether you want a certain area to be darkened, lightened, sharpened, saturated or anything else this is one of the easiest ways to do it.

I find this editing process relevant for most types of photography, but tend to enjoy its results a lot more on portrait and landscape shots.

When you open the gradient tool on the left menu in photoshop (a rectangle that fades black to white, could be hidden under the paint bucket tool if you can't find it), you have 5 options at the top which look like this:


From left to right, you have linear, radial, angular, reflected and diamond. I've only ever found the linear and radial options useful. I will show an example for each of these three following.

First, the linear gradient. This is a fantastic option for landscapes where you have a simple sky and land or sky and water set up, and either the sky or ground needs to be lightened, darkened, saturated, sharpened or anything else.

The best way to even out sky and ground in a photo is always with an ND grad filter (see accessories). If that's not available, or you've used an ND grad and still need some more adjustment, this helps. Usually I will use both an ND grad (or 2) and this tool as a combination.

This is a photo I took recently at airlie beach, using an ND4 grad filter (to darken sky, lighten water) and an ND8 filter (darkens all of the photo, slowing the shutter speed to smooth water). This was shot at 5 seconds, f/22 at ISO100 - the smallest ISO and largest f/number giving the slowest shutter speed possible, which smooths out water. This was at 10mm on my sigma 10-20mm.

As a general rule, the sky will pretty much always be lighter than the ground, so I use a setup like this very often. This is the shot straight off the camera, a bit red/purpley as that is the effect of the plastic filters. I don't mind the effect though as it gives it quite a cool sunset look:

Never mind the dust spots in the top left of the photo - the filters are a bit dirty. I will get rid of those at the end using the clone stamp tool, google it if you're not sure. Next thing to do - it's a nice shot but there is some saturation and light lost in the water in this photo. What I want to do is subtly lighten and saturate the bottom half of the photo to even it out nicely.

Here we go! Select the gradient tool -> linear gradient (the first one out of 5). Hit the 'q' button to enter quick mask mode. What you'll need to do now is drag the cursor perpendicular to the area boundary that you want to change. Drag this from the area you want kept the same, towards the area you want to edit. The longer the drag distance, the more graduated your edit will be. The boundary between water and sky in this shot is quite obvious, so let's not drag too far:

In other circumstances, or when I want the edit to be less obvious, I might drag the cursor all the way from top to bottom. As a simple horizontal sky/water arrangement, this wasn't needed.

When you release the cursor, the photo will look like this. The red area is the area that won't be edited, the clear area will be:

Hit 'q' again to escape. Now your photo will have a selected zone which you can edit:

Now all actions you make will only be made on this gradiated section - even though it looks like a rectange, the top of it is graduated, so what you do will be very subtle and not look like it was overprocessed. I used levels to brighten midtones, and added some saturation to the magentas to bring the purple up. I deselected the area, and used levels again on the photo as a whole, now that it was evened out. After clone stamping out the dust spots and also the distracting tree at top right corner, voila! A nice and evenly exposed and saturated photo, from top to bottom:

It's not a massive change - but that's the thing, it never should be. The best way to edit is to make it look like you didn't at all, to make subtle changes that vastly improve the shot without the viewer noticing. The gradient tool is massive for me in making this happen.

Check out part 2 for usage examples of the radial gradient!

Cheers
Tal

Monday, April 12, 2010

Photo Disect - Light Painting

This shot has been my most popular one on flickr, and generally gets people's attention because it's different to a 'normal' photo:


There's a few elements to the creation of this shot - and it's definitely a creation! Some of my favourite shots are just snaps or captures, but this one took some real effort.

My mate kez and I ventured to the pine forest between Brisbane and the Sunshine Coast to get some eerie shots of the trees. We got a few, but decided to try something cool while we were there - light painting the trees. Light painting is a method where a very long shutter speed is used, usually at least 15 seconds so tripod a necessity. During the exposure, parts of the photo are 'painted' with light - it can be done with a torch, flash or any light at all.

Trees look great when you introduce perspective to them - so I used my ultra wide sigma 10-20mm at its widest focal length - 10mm.

Because this photo covers such a vast area, I needed lots of power to paint the trees in, so i decided to paint with my speedlite flash 430EX II (see Accessories). I tested the ambient light with a few practice shots, to make sure that even though the trees were lit up, a bit of light could be seen in the sky and on the ground. I also tested the brightness of the flash at full power to see what aperture and ISO would be needed to show up the flash. I eventually settled on a shot in manual mode - around 1-2 minutes (depending on how long it took to paint in all the light), with a the widest aperture possible of f/4 at the relatively high ISO800. When using the finger button or self timer, modern DSLRs only take photos to about 30 seconds, but I was able to increase this past 30 seconds using my cable release (see Accessories).

All that was left was the painting! When light painting, it's very important to make sure the source of the light cant be seen in the photo, otherwise it will show up very obviously. I walked about 100 metres down the track, stopped, and then slowly started walking backwards. I illuminated the trees on either side with the flash set to 1/1 (full power) every few seconds, at about a 45 degree angle away from me. Once I was about 10 metres from the camera, I stopped, and unclicked my cable release, closing the shutter. This was the result straight off the camera:


Pretty cool I thought, but not amazing - the ground was a bit dark. We thought of trying to light paint the ground and the trees with another shot, but the flash was nearly melting already after being fired at full power so much, so we headed home.

There wasn't too much done in photoshop - I used a gradient/quick mask edit (will be posting tutorial for this soon) combined with levels to lighten the ground, evening it out with the rest of the photo. After that, I used levels to add contrast to the photo as a whole. I was already happy with the saturation as I had set it to +2 as part of my in-camera processing.

In the end, what makes this a good photo is the uniqueness of the idea behind it. Photographically, the composition is very simple, it's a little grainy and probably a bit too orange. This doesn't matter though, as most people wouldn't have seen anything like it before.

So have a go with light painting! Tripod and cable release are necessities, as you'll be looking to shoot 30 seconds+. To do this, you will need to shoot in Manual mode (don't be scared!) and roll the shutter speed past 30" - it should say 'BULB'. Have a play around with a few apertures and ISOs, and just switch the cable release on when you start painting, and switch it off when you stop. It's a good idea to go to www.flickr.com and search 'light painting' for some ideas and inspiration.

Good luck!

Cheers
Tal

Wednesday, April 7, 2010

Photo Disect - Gradient Map

After getting a few basics out of the way, gear, shooting and processing (see top right for those) - I'm going to be throwing up photos with explanations of the shooting technique and method.

This is my first one - my favourite shot from a trip to Canberra I had recently. I'm not normally prone to editing so much, and this one could nearly even be called more art than photography, but it's a great example of the use of the 'gradient map' tool:


It is a photo of the US Monument to Australia for WW1 (I think..), edited to represent the colours of the US: red, white and blue.

Here is the original shot:


We were cruising around canberra in a car towards sunset. In a car, I like to have a telephoto lens to capture things in the distance (anything close just ends up as a photo of a road or other cars) - so I had my 70-300. The 70-300 is a bit dodgy at apertures wider than about f/8, so I had it on Av mode at f/10 and ISO400 to ensure a fast shutter speed for the moving car. I also had the white balance set to 6000K (cloudy) to really boost the nice sunset colours. The camera here chose 1/1600 as the shutter speed.

I like the photo, but it's a bit too simple for me. I decided that either something cool should be done to it or to get rid of it. It's always worth a try!

Firstly I made it exactly straight and centred using a crop.
Then I decided on using a gradient map. A gradient map is a function which will convert certain parts of your photo to certain colours based on their brightness - whether they're a highlight, shadow, midtone or something in between (see levels for an explanation of these).

I opened gradient map tool (image -> adjustments -> gradient map) and clicked the colour gradient there to open up further options. Out of the 'presets' there, I chose one which featured three colours. I changed these to blue, red and white, meaning that the shadows in the photo (the right half of the statue) would be blue, the midtones (the sky/backdrop) would be red and the highlights (left half of the statue) would be white:


I had a play around with the square colour icons you can see at the bottom of the gradient there to get the colours exactly where I wanted. I also dropped the smoothness somewhat to increase contrast between the colours.

I hit 'ok', and the photo was saved and completed.

Have a play with the gradient tool function! If you find you've got an arty and simple composition but the photo just doesn't pop with natural colours, you might be able to find something interesting.

Cheers
Tal

Photoshop - Saturation

The simplest editing tool - basically just for saturation adjustments.

Find the 'Hue/Saturation' option in the menu. Ignore 'hue', and adjust saturation less or more to your liking. Don't overdo it either way!

Cheers
Tal

Processing - Photoshop Crop

Cropping, um, why do we need a page on this?

Because it's the easiest way to make a photo better! I've seen too many shots ruined by a distracting element on the edge of a photo that could have easily been cut out. In photography, simplicity is crucial - some good advice I've read when composing (or cropping) is that you should not think 'what can I fit in?' - you should think 'what can I leave out?'. The less there is in a photo, and the more well placed it is, the more impact it will have.
The most important part of cropping a photo, especially if it is a landscape or urban shot, is to level a horizon. Here's an example:


A decent shot, with some potential - but it's easy to see that the horizon is crooked. Lets fix it! Use the crop tool, found on the toolbar on left. As a rule I usually crop keeping my camera's 4272x2848 pixels, entered at the top. I like to do this to keep all my photos at the same ratio, which is best for prints. Others will do it differently. Anyway - back to the photo, the horizon needs to be levelled. Drag the crop across until you get decent width across the photo. Then hover your mouse across one of the bottom corners of the photo and you should see the mouse turn into a small rotation symbol. You can now rotate the crop to level with the horizon:


Once you have the crop levelled, you can choose the size and position of your new composition. It is good to have the interesting parts of the photo at the points where thirds of the photo intersect - known as the rule of thirds (http://en.wikipedia.org/wiki/Rule_of_thirds). So I will crop to this:


The tower is placed at the intersection of 2/3 to the right and 2/3 to the top of the photo - pleasing to the eye. Behold, a much better photo!:


Have a big play around with crops on photos that you take and see what pleases your eye. Remember, horizons level, less is more, rule of thirds, you can't go wrong!

Cheers
Tal

Processing - Photoshop

Photoshop!!!
Photoshop is simply brilliant. The amount of things you can do is endless, and in a year I still haven't learnt a tenth of them. I use Photoshop CS3, but Photoshop elements (so much cheaper) is fine for 90% of the rest. What I have learnt is a few simple tricks to getting a more professional shot:

Levels
Crop
Hue/Saturation
Gradient edits

The first three are very simple, the fourth a bit more advanced but a piece of cake once you get used to it, and an amazing way to edit.

Follow the links from the page on top right of the blog under 'Processing'.

Cheers
Tal

Processing - Photoshop Levels

Found in both CS and elements versions of Photoshop. I've always used levels! It's simple. and awesome. In CS3 this is image -> adjustments -> levels, and will look like this:


The histogram of the photo is shown, along with three slider wedges underneath that you can move. A histogram is a record of shadows, highlights and midtones within a photo. If you have a histogram heavy on the left (shadows), it will be quite dark. If it is heavy in the middle (lots of midtones), it should be exposed well, and if it is heavy on the right (highlights), it should be quite bright. Some people swear upon histograms for how good a photo is - but don't worry about it. If the photo looks good, it looks good!! You'll just need to understand the concept of shadows, midtones and highlights to use levels properly.

You can see the left wedge is black - for shadows, the middle one grey - for midtones and the right one is white - for highlights. I'll use a random photo off camera for an example of the effects of these:

The photo is decent, but a little bit dull. Levels will definitely improve it.

Moving the left wedge to the right will darken shadows - adding contrast. Here I have moved it to '20':

Moving the right wedge to the left will brighten highlights - making the bright parts stand out more. I have reset the photo to the original and then slid the highlights left to '235':


A simple levels adjustment is to darken shadows slightly, and lighten hightlights slightly. This gives a nice polished, professional look. BUT - DON'T OVERDO IT!! Otherwise you will turn into an indie.

Moving the middle wedge at times is important too. If you have under or over exposed, it is a great fixer:

Moving the middle wedge to the left will brighten midtones, an easy way to brighten a photo without making highlights over-expose.

Moving the middle wedge to the right will darken midtones, an easy way to darken a photo without sending shadows into oblivion.

When you lighten or darken midtones, the photo usually loses some contrast, so it's usually good to even them out - If I lighten midtones, I usually slightly darken shadows. If I darken midtones, I usually slightly lighten highlights.

My most common action in levels seems to be to brighten midtones slightly, and then darken shadows slightly. This seems to give a nice professional look. Try it for yourself!

Cheers
Tal

Processing - In Camera

There are a few simple settings in-camera on Digital SLRs that can be set to give you a more vibrant and professional shot straight off the camera.

On Canon DSLRs -> Find 'picture style' in the camera menu, enter it, and scroll down to see 'user def 1, user def 2, user def 3'. These are three in-camera processing settings that you can edit yourself. Scroll to user def 1, hit 'disp' and you will see 4 bars that you can edit. I have changed saturation to +2, and kept the other 3 bars the same. This gives a nicely saturated shot straight from the camera - the first step in a polished, professional looking shot.

On Nikon DSLRs (from kenrockwell.com, excellent website) -> Press MENU, select SHOOTING MENU (camera icon on left), go right (into the menu selections) and go down to the next page to SET PICTURE CONTROL, go right to the four standard options, and click two down to VIVID. This gives a nicer, more natural and professional result.

So there you go - a simple way to get better shots straight off camera. This has certainly helped me get shots that pop when I do event and sports photography - I dont have time to go through 100s of photos and edit them all, so this saves time and gives a great result.

You can have a play around with these settings - my user def 2 is a sepia high contrast edit and user def 3 is undersaturated+high contrasted for another cool effect. Check them out!


Cheers
Tal

Processing - Overview

Many people think that post-proccessing of photos (through photoshop or similar programs) has only been important since digital has been introduced. Not true! Check out what the famous film photographer Richard Avendon scribbled on his shot when he sent it to his printer (from an excellent post on blog.chasejarvis.com):


The + and - marks all represent different magnitudes of dodging and burning during the film printing process, a method that is still used effectively in photoshop programs today.

So pretty much every form of good photography involves post-processing and editing. Get used to it!! And don't call anyone a cheat who does - because it takes skill to edit subtly and tastefully, while still improving the original shot.

I have always tried to get the best possible result straight off camera - and I do use a few 'in-camera' processing techniques - but 99% of the time I will at least make minor adjustments in photoshop afterwards.

Keep reading through the processing links in the top right for a few simple editing techniques that I use in camera and out of camera.

Cheers
Tal

How to Shoot - Shooting Modes

On a DSLR, there are many modes you can shoot on, ranging from fully automated green square to manual:

Various Scene Modes
Green Square
Program Auto (P on Canon + Nikon)
Shutter Speed Priority (Tv on Canon, S on Nikon)
Aperture Priority (Av on Canon, A on Nikon)
Manual (M on Canon + Nikon)

The goal of anyone who wants to take great photos, hobbyist or professional, should be to shoot in either aperture-priority or manual modes. These give the best control over a photograph, resulting in the best possible shot.

A DSLR in green square mode is hardly better than a compact. You can't spend 5 grand on a camera, shoot in auto and expect results.

A good idea is to spend a few days getting a feel of the camera in green square, but to upgrade to P mode as soon as you can, and then beyond. P mode means that the camera will choose Aperture and shutter speed for you, but you have the option of playing around with other settings. Once you get used to manual of control of simple settings like focus mode, focus points, ISO and white balance (see Other Settings), you can play around with shutter speed and aperture. Shoot as much as possible, try as many things as you can, and you will slowly start to get used to how the camera works.

Just go SHOOT!!!

Cheers
Tal

How to Shoot - Other Settings

There are some other settings that will help you get the most out of your camera:
White Balance: The quality and colour of light sources can differ extremely, and affect your photos in terms of saturation and colour. This is usually measured in temperature - ranging from about 3000K (bluish) to 7000K (orangey/red). For example, light coming from sources like candles or orange streetlights has a very high temperature, and light in the shade on a sunny day has a very low temperature. Modern digital SLRs have decent auto white balance - which I use 80% of the time, but sometimes manual control of white balance is needed. White balance settings on DSLRs aren't too difficult to work out - when it's cloudy, it's a good idea to have the white balance set on 'cloudy' mode, etc. The tungsten setting is great for scenes lit by candles or orange streetlights. Manual control will always give you a more natural result.

Exposure (if not shooting on Manual): This is quite basic, and on modern DSLRs is usually represented as a wheel going from -2 to +2. When you are shooting in any mode other than manual, the camera has to choose settings for you. The exposure wheel is you giving the camera somewhere to base its decisions on - it's usually best to have this at 0 (right in the middle) on cloudy days and indoors, or -2/3 on a sunny day. The luxury of digital is that after a photo is taken, you can see the result straight away. If the photo was too bright, maybe wheel the exposure down a few thirds. If it was too dark, do the opposite. Easy but important!

Autofocus Mode: Three basic modes here, One shot, AI focus and AI servo. One shot focus is when the camera locks on to a point and will hold the focus there - good for landscapes, portraits and pretty much anything that doesn't move. AI servo focus will constantly keep changing the point of focus as the subject moves - perfect for sports, wildlife or anything moving. AI focus is more of an in between automated mode. The concept is that when something is still the focus will stay still, when something is moving the focus will move with the subject for you. Sounds great in theory, but I've found it sometimes unreliable and easier just to switch been one shot and AI servo.

Autofocus Points: This is an important one which many people miss. Looking through the viewfinder you can see a number of points that will light up when something is focused on. By default, the camera has these on automatic selection, trying to focus on the closest thing to the camera. In many forms of photography, however, the closest thing is not always what you want the focus on. The following picture for example:


If I had kept the camera on automatic focus point selection, the clowns in the front would be in focus and the photo wouldn't be anywhere near as cool. Digital SLRs give you the option of choosing a unique point with which to focus. On canons this is the button on the very top right of the camera. Make sure you have a practice with this - as focus is so important with photography. Shooting a portrait, for example, common practice is to always nail the focus on the eyes. If the camera is on auto-focus-point select, the photo will probably be focused on the nose and be nowhere near as effective. Try it for yourself!

Drive Mode: This is pretty basic, you have single shot, which will just take one photo. You also have continuous mode, which will take photos at quite a speed, depending on your camera. SLRs can go anywhere from 3-10 photos per second. Continous drive mode is a must for sports. I prefer to have continuous mode on 100% of the time, so I never miss a moment.

The best way to master all these is practice practice practice, just go out and shoot, play with them individually, play with them together, thats how you learn!

Good Luck

Cheers
Tal

How to Shoot - ISO

ISO is a basic setting on modern digital SLRs, usually ranging from 100-1600, although recent cameras have started pushing upwards of 12800 and more!

ISO is purely a measure of how sensitive the digital sensor is to light. An ISO of 200 will make the sensor twice as sensitive to light as ISO100. The trade-off, however, is higher noise - graininess in the photo.

Most modern digital SLRs are great up to about ISO1000, and still fairly useable up to 3200.
When shutter speed is important, the ISO setting is very important, as it will help gain either a faster or slower shutter speed.

It is common practice to aim for an ISO of 100-200, however with modern DSLRs being quite clean up to 1000+, you shouldn't be too worried about it. I am usually at around ISO400 for everyday snaps, and will go up and down depending on the situation and amount of light around.

For example, shooting sport usually requires a high ISO. This will ensure that the sensor is quite sensitive to the light coming through the lens, meaning that the shutter can be open for a shorter time, freezing the action. This is a photo of a swimmer, swimming indoors, at ISO1600. The photo is quite clean:


If shutter speed is not important, usually if it's quite bright, or you are using a tripod, ISO100 and 200 are definitely the best option to ensure clean photos.

ISO doesn't affect a photo nearly as much as aperture or shutter speed, so it's not a bad thing to have it set on auto - however the more control you have over the camera, the better your photos will be.

Try out the effects of ISO by shooting on P (program auto) mode. See what shutter speeds and apertures the camera chooses when you manually change the ISO from 100 to 200 to 400 and etc.

Good Luck!

Cheers
Tal

How to Shoot - Shutter Speed

One of the most fundamental concepts in taking a photo is the shutter speed. The shutter speed is the amount of time that the camera's film or digital sensor is exposed to the light coming through the lens. On modern digital SLRs, this usually ranges from about 1/4000th of a second to 30 seconds.

Shutter speed usually needs to be controlled for three reasons: exposure, sharpness, and long exposure effects.

Shutter speed, aperture and ISO are combined to form an overall exposure - the brightness of a photo. A slower shutter speed means that the sensor or film is exposed to light for a longer amount of time, meaning that the photo is brighter (known as a higher exposure). With the same aperture and ISO, a faster shutter speed will mean that the photo is darker.

Shutter speed is also important when attempting to control the sharpness or amount of blur in a photo. When shooting hand-held, it is important to control your shutter speed so that hand-shake will not cause a blurry photo. As a general rule, your shutter speed should be 1/focal length of your lens. For example, shooting at 100mm on a telephoto lens, you should have a shutter speed of 1/100th of a second or faster to ensure a sharp photo. Image stabilisation, found on most modern lenses, can help with this, but only when shooting still subjects.

Shutter speed can also be used for effect. Slow shutter speeds will soften water, and turn passing cars into light trails. Below is an example of the same photo, taken at 1/1600th of a second and 0.8 seconds. The longer shutter speed has softened the fall of the water, giving a much more polished, impressive and professional look the the photo:


Shutter speed is one of the funner settings to have a play around with - so go outside for a day, set your camera to Tv (canon) or S (nikon) mode and play around with long and slow shutter speeds, both handheld and on a tripod.

Good luck!

Cheers
Tal

How to Shoot - Aperture

In it's most basic definition, aperture is the width of opening of a lens when it is taking a photo. On a camera, this is measured by what is called an f/stop - and will be labled like "f/2.8, f/4, f/22" etc. The smaller f/number you have, the more open the lens is. The following diagram from shortcourses.com explains it well visually:

There are three main things that the aperture setting will affect: the amount of light coming through the lens, the depth of field of the photograph, and the sharpness of the photograph.

There are times in photography where you will need as much light as possible coming through the lens - using a small f/number. This will give you a fast shutter speed. An example of this is sport, where your shutter speed needs to be quick to capture the moving subjects sharply.


There are also some photographs which can only be taken effectively when you need to lower the amount of light coming through the lens, with a higher f/number. This is when you want to achieve a slower shutter speed - such as a long exposure of cars driving on a highway at night.


So as you can see, controlling aperture is essential when you are in need of control of a specific shutter speed.

Aperture is also crucial in controlling depth of field of a photo. Depth of field is basically how much of the photo is in focus.

A narrow depth of field is great for photos where you want the subject to stand out from the background and foreground, such as a portrait:


A wide depth of field is great for photos that benefit from having as much as possible in focus, such as a landscape shot:


At other times, you may just want a photo as sharp as possible without worrying about shutter speed, such as shooting a landscape on a tripod. For this you should choose a mid-range f/number, usually around f/8-13 depending on the lens.


The best way to practice all of this is to go outside one day and shoot all day on Av mode, trying lots of different as you can and see the results. If you have a telephoto or wide aperture lens (one with a small f/stop such as 50mm f/1.8), use those as the results will be more exaggerated.

I shoot Av (aperture control) and M (manual control) 99% of the time, and most professionals will do the same. Controlling aperture to control shutter speed, depth of field and sharpness is a crucial part of being able to take a great photo, so make sure you practice with aperture as much as you can.

Good luck!

Cheers
Tal

How to Shoot - Overview

Regardless of what camera you have, film or digital, there are some basic but very important settings that need to be controlled when taking a photo:

Aperture
Shutter Speed
ISO

Depending on the situation, there are also other settings which may be important:

White Balance
Exposure (if not shooting on Manual)
Autofocus Mode
Drive Mode

These can all controlled in camera, depending on what mode you are shooting on.

Follow the links on the top right hand corner under "How to Shoot" to see tutorials on how to use and control each of these.

Cheers
Tal

My Gear - Accessories

There a few accesories that I use apart from my camera and lenses, depending on the situation.


I have a Canon 430EX II Speedlite Flash Unit, which I use combined with a Flash Diffuser (from ebay for about 5 dollars - just search speedlite flash diffuser) for events. I also use this combined with imitation pocket wizards (also ebay for about 50 dollars - search wireless flash) and a strobist umbrella kit (digitalcamerawarehouse.com.au search strobist kit) for external lighting in portrait, fashion, commercial and musician shoots. Having a speedlite flash with a diffuser is great for softer portraits in dark situations, like this:


The on-camera flash is quite harsh and is sometimes just not powerful enough. I strongly recommend and external flash unit like the 430EX that can have its head rotated for bouncing both through the diffuser and off walls and objects.Shooting the flash externally with wireless connectors is a brilliant way to get a much more professional looking photograph, like the one following which was taken for a 'no water sucks' photo competiton. A flash was placed at camera left and balanced with ambient light to create a more striking portrait of my thirsty dog.


External flash can seem difficult and a bit of a hassle, but there is a brilliant resource on the net to help you through at strobist.blogspot.com. I haven't had a great deal of experience with it yet, but will keep you updated on lighting set ups for any future shots involving external flash that I put up.

Another lighting accessory that I use is a 5-in-1 reflector, easily gettable off ebay for a lot cheaper than what you would find in a store.


The reflector includes white, silver and gold reflective circles, a white diffuse-through circle and a black light block circle. I mainly use the gold and silver reflector for a subtle way to seperate the subject from a background, and the white reflector for lighting up harsh shadows. These are great! Here is an example of a portrait lit with the gold reflector, subtle but effective:


Like every photographer should, I have a tripod. I was using a cheap 20 dollar one for about 2 months, but it was terribly affected by wind and not very versatile in terms of possible leg positions, important when you need that perfect angle. I grabbed a Velbon tripod for about 200 dollars, and have never looked back. It stands up to very strong winds, but more important it has free legs - each leg has the ability to move independently and almost to horizontal. This is an extremely important consideration to make when you're getting a tripod - when you're shooting shots somewhere like a waterfall or creek, you'll need the versatility. I'd post the exact specs and a photo but in the end, if you buy something above about 100 dollars that has free legs, you can't go wrong.

Together with my tripod, I use a canon remote shutter release:
You can also buy wireless remotes for similar prices, but for some reason i've always liked having the cord. These are about 35 dollars, or probably something like 7 for an off brand one on ebay. Although you can effectively take shots on a tripod using the self-timer, it's so much easier to just have this so you don't have to wait 3 seconds before each shot takes. It might not sound like much but it might be the thing that makes you miss a huge lightning strike, or firework burst. Another crucial feature is that it allows shots to be taken longer than the camera's preset 30 seconds. This is great for shooting in areas of extremely low light, especially when a narrow aperture is needed. This might just be my favourite accessory, I would hate shooting landscapes without it!

I have two netural density graduated filters, and one neutral density filter. These are rectangular, and supposed to be mounted onto an adaptor at the front of a lens like this:

I find the adaptor cumbersome and annoying, so I usually just manually hold the filter or filters in front of the lens myself. I absolutely love these filters for landscape shooting, especially the ND grads. They start dark at the top and gradually change to clear at the bottom:


This helps even out a bright sky and dark ground, and creates stunning landscape shots. Most of my favourite landscape shots have been done using this technique, like this one:

Check out this page for a good run through of using these.

The only disadvantage is that these plastic ones tend to give a slight purple tinge to the top half of the photo. This can usually be edited out on photoshop. Sometimes like this photo though, it works out perfect!

The accessories you choose to get should be based on what you shoot, or what you want to shoot. In my opinion, the speedlite and tripod are definitely the most important out of all of these. If you are keen on landscapes, the cable release and the ND grads are great. If you are keen on portraits or fashion, reflectors and external flash accessories are worth a look. These are all pretty basic accessories - there's plenty of info on the net if you want to get even more funky!

Cheers
Tal

Tuesday, April 6, 2010

My Gear - Lenses

I have 4 lenses to go with my 450D - a wide angle zoom, mid range zoom, telephoto zoom and wide aperture prime. These are a Sigma 10-20mm f/4-5.6, Canon 17-85mm f/4-5.6 IS USM, Canon 70-300mm f/4-5.6 IS USM, and Canon 50mm f/1.4 USM.
It's important to have a decent range of lenses, as it is the lens which ultimately makes the picture. A good entry level camera kit is one that comes with two lenses, usually something like an 18-55mm and 55-250mm. This offers good coverage from wide to tele, but there are definitely a few more options which you should consider. Aperture control is an extremely important part of shooting, and cheap zoom kit lenses are a problem in this regard. I will delve into it more later, but a basic feature of a wide aperture lens is that it throws foreground and background out of focus, making the subject stand out and giving the photo a very professional look.The best cheap option for this is the Canon or Nikon 50mm f/1.8 - you won't be able to zoom in or out but you will be able to shoot brilliant portraits, live music, product shots and just more interesting photos in general. The 50 1.8 goes for about 130-180, and it is the best deal you will ever get. I used one for a year as my main lens for portrait, live music, fashion, band photos and even as a back up for sharp urban and landscape shots. Just get one! I used mine so much that I decided to upgrade to the slightly faster 50mm 1.4.Another lens to consider is a wide angle zoom. I have the sigma 10-20 which goes for about 700-900 dollars. Nikon and Canon both offer a wide angle in this range and they are slightly more expensive but both brilliant. The 10-20 is my number 1 lens for landscapes - 10mm offers so much more in terms of perspective and that epic feeling in a shot than 18mm. Not a necessity, but if you have the money, definitely worth it.

My other two lenses, 17-85 and 70-300 are my mid range zoom and telephoto zoom. Two lenses in this range are no-brainers, and my two are pretty much the basic upgrades from the standard 18-55 and 55-250 you would get in a kit. They are a bit better with sharpness and focus speed, but if you are shooting properly the kit lenses will be great.

Cheers
Tal