Radial Gradient. This one produces a circular gradient, and is perfect for attracting the viewer's eye to a particular part of a shot. I find most use for this in portrait, fashion, or band shoots. I will usually darken areas around the face and lighten and sometimes sharpen the face. This is done subtly - you want the viewer to look at a certain part of the photo without realising why. There are plenty of wedding and portrait photographers who will completely overuse this or the vignette tool for effect. It looks gross, and unprofessional!! If you nail a gradient edit on a face in a portrait subtly, the effect will be many times more effective.
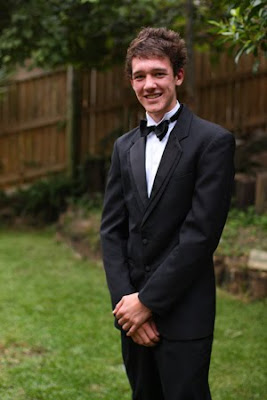
Here's a portrait style shot I shot recently at a pre-formal event. This was shot on Av mode at an aperture around f/2.0 for background blur, ISO400 for a quick shutter speed to make sure of sharpness. His head, the main focus, is at about the intersection of 2/3 to the right and 2/3 to the top, bit of a rule of thirds! Check it out on wikipedia - just search rule of thirds, a professional way to shoot portraits that will help you stand out from those shooting dead centre. Shots like the official presidential portrait of Barack Obama are done this way!:
 Nice shot off camera - but a good idea to make the attention more towards his face. Time for a radial gradient. In photoshop CS, hit gradient, at the top choose radial (the circle one, second from the left). Then hit 'q' to enter quick mask. Drag the cursor out from the centre (his face here) to twice the length of the radius you're looking to edit, like so:
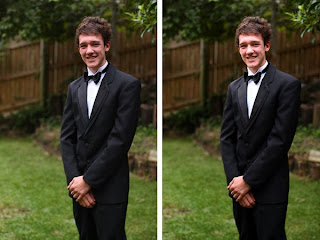
 You will see a red circle fading outwards appear over the target. This is the gradial area that won't be affected by your actions. Press 'q' to escape quick mask and you will see a selection circle. Everything outside this circle will be affected by your edits, but it will be faded, and not obvious. This gives you a great opportunity to subtly lead the viewers' eyes to a certain part of your photograph. For this shot, I used levels to darken midtones in the area around the face, and then hit select -> inverse to reverse my selection, and brightened highlights on the face. I deselected the area and gave the whole photo some brighter midtones using levels again. Here is what I came up with, and a comparison of the original. It is subtle, but a big difference, exactly what you should be looking for. Original is the left, edit on the right:
 The photo looks barely edited, but draws attention straight away to the face. Great way to use radial gradients in my opinion - but as I've said, DON'T OVERDO IT! Or you will just be another one of those people that over-vignettes every photo - unprofessional, and lazy!
So hopefully these 2 tutorials have helped you understand the possibilities involved with using the gradient -> quick mask option. Even though it does gradially edit, you still have to be careful that it's not obvious to the viewer that your photo has been edited. Have a play around with bigger and smaller radius options for both linear and radial gradients and see the effects.
Good Luck!
Cheers
Tal

No comments:
Post a Comment