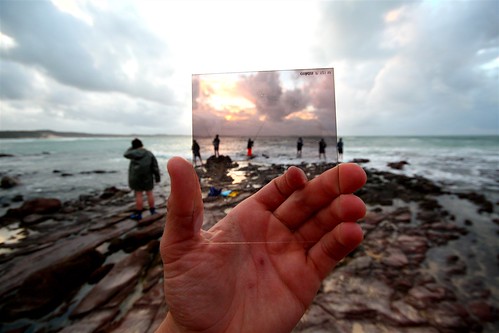
 I'm hoping this photo disect is something that will be very interesting - when I was doing my initial research on ND grad filters it took so long to work out what they actually are. Check out my accessories page to have a look at that:
 ND grad filter means "Neutral Density Graduated Filter", meaning that the top half of the filter is dark at a neutral density (no colour), and gradually fades into clear at the bottom half of the filter. You can get these at different magnitudes ND2, ND4, ND8 etc - I find getting 2 ND4s is usually the best option. I have 2 of these, and half the time I use 1, the other half I like to stack them on top of each other for more of an effect. Just don't store them in the same case, or they will rub and scratch.
I was out shooting sunrise at a beautiful harbour in eastern Victoria on the summer holiday road trip I had with some other photo-minded mates. I saw a great cloud/water reflection happening and wanted to shoot it against the subject of a pier and sailboat. I shot it without any filters, and noticed that while the reflection was present, the water was considerably darker than the sky (as usual) and the photo wasn't very effective. This often happens - your eyes will automatically lighten dark areas and darken light areas - the camera cannot do this. Being able to see like a camera takes a bit of experience - whenever you shoot, make sure you note the difference between what you see and what comes up on the camera screen - it will help! ND grads are a great help with this.
I decided to stack my two ND4 grad filters together and got this shot straight off the camera. I was shooting Av (aperture priority mode) on f/6.3 with my sigma 10-20mm lens set at its very widest at 10mm. To get a quick shutter speed (as I didn't have a tripod - mistake!) I was on ISO400 - a lot faster than ISO100, but a little bit of grain. ISO400 is probably my favourite for handheld shooting, the noise is manageable and you get a nice quick shutter speed. Here's the result straight off camera:

Nice, but pretty drab, and I find the water to still be a bit dark for my preference. Also find the patch of trees at the right distracting. You might also notice a purple/pink tinge to the top half of the photo. This usually occurs with plastic filters - it can be edited out in photoshop but I actually like the effect in this shot, makes it interesting!
Now to photoshop :) Don't call me a cheat - this is just the equivalent of going into the darkroom for all those purist film photographers. Lots of people (usually oldies :P) come up to me and say oh I used to take such good film photos but my digital ones just aren't very good, I can't work out all the settings etc etc. Silly! The cameras are the same - you still only really have to worry about aperture, shutter speed, ISO and white balance. All the other settings don't make a massive difference, or are gimmicks to get you to buy a new camera. The difference for people who used to shoot film is that they would have their shots professionally processed by people who knew what they were doing. This is the equivalent of sending your digital originals to a photoshop guru - the results are obviously going to be great. People need to understand the importance of at least a decent grasp of the basics in photoshop which really aren't hard to learn. Check out my photoshop tutorials for that.
Anyway, rant over! I cropped to get rid of the distracting element at right. I then used a gradient quick mask edit using levels to keep the sky the same exposure, but lighten the water. After the photo was even, I used levels again on the photo as a whole to get the contrast and exposure perfect. I then added in some nice saturation to make it pop.
Et voila!
Here's a comparison of original to edited. Not too big an edit really - exactly the kind of thing that a film lab would do for you back in the day.

If you're into landscapes - ND grads are awesome. Get 2 cheap on ebay -
http://shop.ebay.com.au/i.html?_nkw=nd+grad+p&_sacat=0&_trksid=p3286.m270.l1313&LH_AvailTo=15&_odkw=nd+grad+p+series&_osacat=0&bkBtn=
Look for one of the cheap rectangular ones, and just hold them in front of the lens when you're shooting - with the darker top half over the light sky and the clear bottom half on the dark ground. Best for sunrise and sunset - light during the day is still too harsh for these filters to make much of an effect. Great results!
Here's a few more shots I've got from my ND grad filters:
http://www.flickr.com/photos/andrewtallon/3708989536/
http://www.flickr.com/photos/andrewtallon/3708180169/
http://www.flickr.com/photos/andrewtallon/4140047330/
http://www.flickr.com/photos/andrewtallon/4199079853/
http://www.flickr.com/photos/andrewtallon/4199859102/
http://www.flickr.com/photos/andrewtallon/4199856030/
Good Luck!
Cheers
Tal

No comments:
Post a Comment