Here is a simple example.
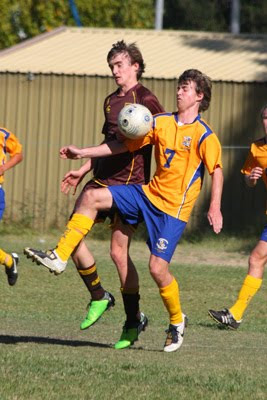
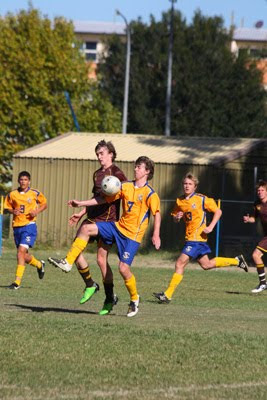
 I haven't edited the photo in photoshop - only cropped from this, the original image from the camera:
I have hundreds of sports shots to choose from but this one is a better example, there's a definite scene unfolding - you can see competition between the teams and most importantly for ball sports, you can see the ball. It's not difficult to understand the concept of a good sports photo, however it can be extremely difficult to nail your technique, especially with consistency.
I have shot this photo in aperture priority mode on f/7.1 and ISO800. This gave me a very fast shutter speed of 1/3200s. I have selected f/7.1 as a decently sharp aperture for my lens - a 70-300mm telephoto. Cheaper plastic lenses like mine don't cope too well at smaller f/numbers like 4-5.6, especially when zoomed to the maximum. This is why I like to stay around f/8 to ensure good sharpness. I will use ISO800 even on bright days to get as fast a shutter speed as possible to stop the action. 1/400 is probably the slowest you would want to be shooting at. Don't be afraid to go to higher ISOs if it will mean you get a sharp shutter speed - its better to have a grainy sharp shot than a blurry one! Sports shooting is about capturing moments as they happen, and its ok to sacrifice some image quality to make sure you get 'the shot'. I shoot JPEGs with my personal +2 saturation edit so the shots come up vibrant and natural off camera (tutorial here).
Nailing the technical stuff is important and can be difficult, but as I said you should be fine shooting aperture priority at ISO800-1600 and around f/8. If the photos are too dark or too bright, use your exposure wheel to compensate. Keep in mind these settings are best for shooting outside in the daytime. If you are shooting indoors or at night, you're best cranking your ISO as high as possible and having your f/number as low as possible. You still may struggle to get a fast shutter speed - unfortunately the best way to shoot indoors or at night is by spending thousands and thousands on cameras with great high ISO perfomance (eg. Canon 1d markIV for $6000) and lenses with apertures around and below f/2.8 (eg. Canon 70-200mm f/2.8 IS for $3000). Ouch!! If you must shoot indoors or at night, try out that 50mm f/1.8 of yours that you picked up for a lowly $130. You won't get as close, but you'll be able to use f/1.8 to get a very fast shutter speed, making your shots nice and sharp - just make sure you crop in photoshop afterwards.
More on the technical side - autofocus. You will want to shoot on continous autofocus mode, which means that the camera will constantly change focus based on what youre pointing the camera at. For example if a player comes toward you, the camera will continously focus on the player closer and closer and you can shoot as you please. On Canon DSLRs this is called AI focus, on Nikons I believe it is AF-C. DSLRs also give you the option of selecting one certain point to focus with (check out this page and scroll down to 'autofocus points'). I always find that the middle point is perfect, and very simple. With all the action going on to worry about, its best to simplify your focussing as much as possible - so remember, always shoot continous focus mode with the middle point.
Now that we're done with settings, lets move on to something even more important - where you take the photo from. Obviously firstly try to be as close to the action as possible. The best shots will tend to be taken as the player is coming towards the camera. For example shooting something like rugby its always good to shoot up and down the sideline (yes, you have to run) and stay about 20 or 30m in front of the where the action is happening. As the play gets closer to the goal you would want to shoot from behind the goal-line. This is going to be different with every sport but just keep in mind that a player facing or running towards the camera will always be a simple way to get a great shot.
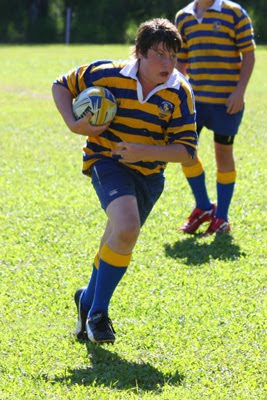
Another part of your positioning will be to do with lighting, especially during the day. If it's cloudy, you can actually count yourself lucky as you'll be able to get great shots from all angles (even if you have to bump up the ISO for darkness). If it's sunny, you have to be very aware. You have no control over which way the sun is shining, only over where you position yourself in relation to it. Always try to have the sun at your back so players are well lit. Most sports will have teams running in different directions per half so you will get away with it, but sometimes like with athletics you won't get a choice. Try to only shoot with the sun behind players' backs when you absolutely need to. Here's an example of a photo taken with the sun behind a player's back. Usually you will need to dial up your exposure wheel to compensate for the dark shadows.
 The photo has still turned out ok, but you can see how bright the grass is compared to the player, taking away the eye's natural focus towards the action. Scroll back up to the original photo I posted and you can see the difference. As I've said, if you can help it, try your best to get the sun pointed at your subject.
There's really only one more thing to cover, which is the most obvious but without some decent experience can easily be the most difficult. Pressing the button! It's surprisingly hard to capture a certain moment in sport - getting that ball sailing perfectly off a foot, capturing a high jump right at its peak, etc. This can really only be helped by combination of experience, knowledge of the sport and using a DSLR, which has no lag between when you hit the button and when the picture is taken. People think that they can buy a camera with 7 photos per second and they'll just hold the button down and hope to get the shot. Surpringly, sport tends to happen even faster than that so no matter how fast your speed, you still need to hit that button at the exact time. There's an easy way to practice this. It sounds silly, but I've taken this advice from some professional sports shooters, to just sit at home and take photos of the sport on TV. Practice hitting the shutter button at the very best moment - you'll be surprised how much it helps you.
There's not really much more I can think of right now. Keep in mind that this tutorial is for capturing 'simple' sports photos. Like anything, there is infinite room to be a bit more creative, but for general sports shooting, this tutorial should have you covered. If you don't like sport much (photographers tend to be pretty nerdy), it's still very helpful for your photography to get out and shoot the action. It is awesome to help you practice getting 'the shot', balancing settings, zoom, position and a lot of things happening at once. If you go shoot a mate's game, you'll be in their good books for a while - sports shots make great facebook profile pictures ;)
Good luck!
Cheers
Tal

No comments:
Post a Comment